Hello freinds,
I am back from my hibernation.All is well.I am happy to inform you all that i have started a new blog called “SHADRUCHI” .I will continue both the blogs. Hope you all will enjoy my recipes.
27 Jul
Hello freinds,
I am back from my hibernation.All is well.I am happy to inform you all that i have started a new blog called “SHADRUCHI” .I will continue both the blogs. Hope you all will enjoy my recipes.
18 Oct

Hello Friends!!!!! I was hibernating even before winter was here. Sorry for that. And I can see fall colours everywhere. Ohh!!!!! They look beautiful. Everytime I find them new and interesting. Now I am back with something u all will love. Just as simple as preparing noodles. Thanks to my friend P. Though I prepare noodles this way simple I never tried with macaroni. It is simple, filling and everyone loves it. You can add whatever veggies u like in it lot of veggies can go in it. I found some free time for a post. I prepared this long back and got to post today. My kid loved Macaroni. So this is for you.
Ingredients:
Macaroni……………2 fistfuls
Water……………….big pot full
Onions………………1/2 small
Veggies…………..carrots, capsicum, tomatoes
1 each (U can use whatever u wish)
Oil……………………1tsp
Salt………………… to taste
Coriander leaves………fistful
Curry leaves……………3
Method:
Note: The capsicum gives spiciness to the dish and tomato gives the gravy which coats the macaroni well. You can make any changes u wish.
You can use wheat macaroni if u like. That’s healthy. And better. Will try it next time.
18 Sep
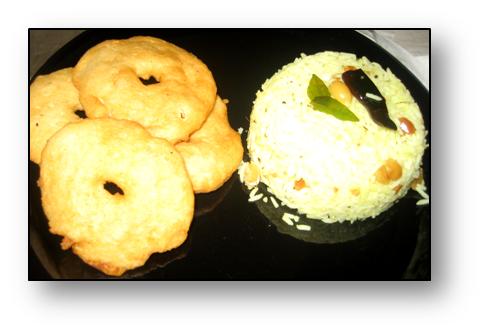
My Ganesh chaturthi went well and now I am out of the hangover of the festival. Not only Ganesha was filled with festive foods but we also stuffed some ourselves. Making us a heavier than before. If we r feeling like this then how would have poor little Ganesha have felt with all those tempting food from all over the world who are celebrating this festival. I can’t imagine. Just you guys think once. So for this Ganesh chaturthi my menu is a little big than every year. I was able to photograph only these two as I forgot the semiya payasam and undraallu in the photograph. And for lunch including all these neivedyam we had rice, dal palak(paala kura pappu),tindora fry(dondakaaya vepudu),papads. See how much food I stuffed into myself and my family. But we were busy in eating somuch that we forgot taking pics and while starting I took a pic and that came to my rescue. This is my entry to RCI KARANATAKA Hosted by dear ASHA of FOODIE’S HOPE uddin vada as they and we call as gaarelu both r same but names r different. We south Indians have some similar dishes which are exactly same. And Mamidikaya pulihora as we call and in Karnataka they call mavinikaya chitranna. So these are my entries for RCI . For more info about RCI karnataka.
Uddin Vada (Gaarelu):
Ingredients:
Urad dal……………..2 cups
Ginger………………1 inch
Green chillies……..3 no
Salt……………………to taste
Oil………………………for deep frying
Method:
Note:
1. If u use mortar and pestle as we use in at home these will be very good and even in blender the batter is made good. Don’t add too much water as u don’t get them to form a shape nor will be able to drop it in oil. But while shaping it u should immerse ur hand in water and brush the plastic cover with water.
2. If we add onions to this batter it’s call ulli gaarelu or ulli vada.
Maminikaayi Chitraannam (Pulihora):
Ingredients:
Mango………………..1 (remove the skin and scrape it into pieces)
Rice……………………..2 cups .
Salt……………………..to taste
Turmeric…………….1/2 tsp
Tadka:
Oil………………………..2tsp
Red chillies…………….1
Mustard seeds……….1/2 tsp
Urad dal…………………1 tsp
Chana dal……………….1 tsp
Peanuts……………………fist full
Green chillies……………4 split lengthwise
Curry leaves…………….4-5
Method:
Note: I used rice cooker measuring cup and rice cooker I used ½ cup less water for my rice.
17 Sep
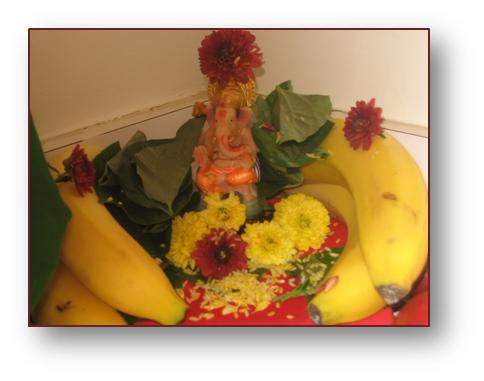
Vinayaka chaturthi was celebrated in my home.
Happy Vinayaka Chaturthi to all of u.
31 Aug
This is the festival I celebrate with much dedication every year. Last week I celebrated it with my daughter. We do this pooja in the 2nd Friday of Sravana Masam the most auspicious day. And if it comes with pournami that’s very good. This year pournami(full moon day) is on Tuesday. I don’t know why I am fascinated about this day and the pooja on the whole. I don’t regularly do pooja even a Namaskaaram to the God though I have great respect towards our God’s. But Vara lakshmi vratham takes a special place somewhere in the corner of my heart and every year i do the pooja. My mother laughs at me as when I tell her I don’t want to do the pooja this year and guess what the next when I wake up I change my mind and do it. It happens every year and this year too. And I don’t know ABC of how to do a pooja I simply follow the book or printouts I find. I think the real essence of doing the pooja doesn’t matter how u do or what u do but how u feel to do and with dedication u do. It should come out of ur heart. Anything that done whole heartedly how bad it may look it will turn out well. I am not a strong believer in god as far as I know even I go to temples to get a peaceful mind and because now a days the temple’s are stacked with people I avoid them on festive days. when its rush and where we can’t even breathe properly. Guys we want peace at least to pray not think of other people walking on us. So after coming to USA I feel so relieved. As u all must have known this festival pooja and importance through other blogs. I am not repeating it. But if u haven’t and need to know anything about it you can find more details here.
This is the 6th year I am celebrating the festival after I have married my dear R. Can u believe it? I too can’t J . Good me. Even in my childhood I used to ask my mom don’t forget my toram( a thread knotted with different leaves and flowers) as I won’t get a holiday from school like my mom has. Good old days the mehandi we put on our hands and happily showed in school and do u know how beautiful our hands used to be. Hakuna Matata(it means no worries). Even now I have no worries but somehow I miss my past days. And not to mention as I am a last minute decider as usual I wanted to keep it simple so I selected the neivedyam to be simple yet nice. In my house sweets won’t go quickly and no time to make Gaarelu and poornaalu my all time favourites. So I made Pulihora, chekkara pongali, Kesari. We decorate a coconut like the Lakshmi devi the goddess we r praying with jewels and flowers.
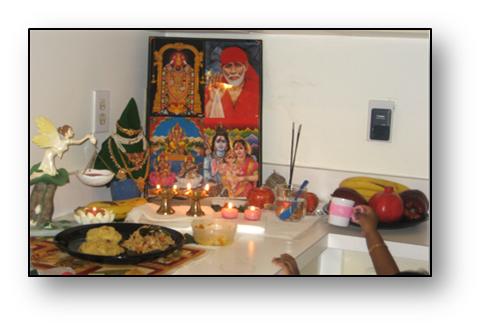
Look in the picture my little girl is helping in doing pooja.
And friends what took me so long to post this is my daughter there is a little bit story too. I make it short. We went to New jersey last week. As we planned already I made the pooja simple so nothing is wasted and nothing is messed up. So in that matters everything went well and the trip was also fine. We enjoyed philly down town and New Jersey 6 flags safari and hurricane harbor. My daughter enjoyed a lot in the water and not to mention she got fever when we returned. It will be horrible if our little ones r down with fever. And it lasted for 4 days with high fever. She got little infection in her right ear which caused the fever. Today she was fine and the doc gave Good recovery certificate on the follow up visit(that is today). So at the end all is well. Now I got time for my post. So here I am writing my post. I should mention but we loved the Hurricane Harbour. We will go again but wait for my daughter to grow another yr older.

I completed the pooja successfully and u can observe my lamination which covers all the gods whom I worship. Lord Venkateswara , Sai baba, Ganesha, Lakshmi, Saraswathi, Parvathi Parameshwara with Little Ganesha. Hope u all like it.
I offered chakkerapongali,kesari,pulihora, banana, pomegranate and apples for Neivedyam.
29 Aug
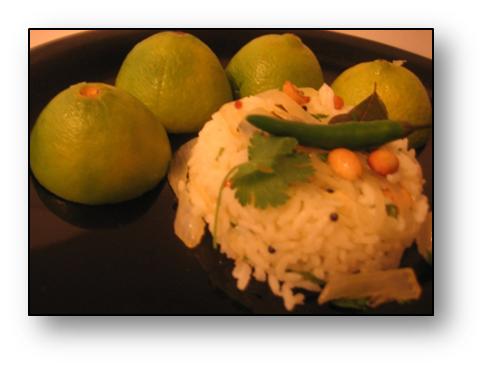
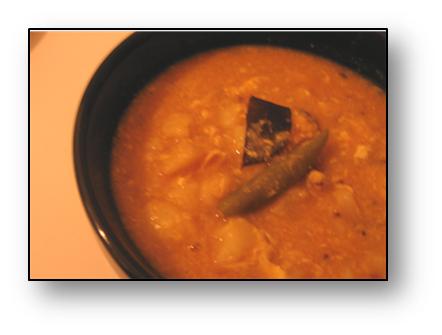
This is my entry for JFI Rice hosted by Sharmi of Neivedyam this month. Brain child of Indira Mahanandi.This is a great event. After trying this and that I have settled for simple lemon rice which is easy to prepare and nice way of using ur leftover rice as well. With all those dishes we can make with rice. I feel this is easy one. And can be made in a jiffy. I have to say that this is different from what we make normally. After hearing my husband I said what? Onions in lemon rice? I added onion to the tadka so it gave a little different taste to the rice which is not typical lemon rice we have in Andhra. But it tasted really good. Well my husband loves it this way and he says in Karnataka they prepare lemon rice this way but I have no idea about it. Well wherever it may originate from the taste is good and we loved it. Well it tasted good.
Ingredients:
Rice………………..1 cup
Lemon…………….1 big
Salt…………………to taste
Turmeric………….1/4 tsp
Tadka:
Mustard seeds………..1/2 tsp
Red chilies……………….2
Chana dal………………1/2 tbsp
Urad dal………………..1/2 tbsp
Curry leaves……………..4
Ginger ………………………cut into small pieces
Peanuts………………….fist full
Green chilies…………2-3 cut lengthwise
Onion……………………..1/2 cut lengthwise
Oil………………………….2 tbsp
Method:
Good for breakfast, lunch, or dinner. As you wish. Great way to use leftover rice.
And last but not the least I too got an award. I am Rocking girl. Thank u Padma.

Now after I got this award I would like to give it out to all my blogger freinds.Everyone deserves it. As we all strive to make difference in our own sense in bringing out the variety of posts whatever it may be in.
16 Aug

This is for “A Mad Tea Party’s” Poori Bhaji Party. Hope I am not late. Though I made them I was not able to take photos of them. Now I again made them for just me and my daughter (well R has gone to office and takes his box) J .My Mom used to make them very often for Sunday breakfast or call them brunches. I was the one who pressed lot of pooris in the poori maker (well I am greedy as I would get one extra poori). Even if I am not able to eat them I want that extra poori. Well now-a-days we don’t make them being health conscious and all and looking how much oil it takes (well if made perfect it don’t take too much oil). May be once a month. But the day we make them we have them to heart. As I told earlier I made these for lunch all within a span of 15mins.
Preparation time: 5mins
Cooking time: 10mins
Ingredients:
Onion…………………1 big cut lengthwise
Green chillies……………2 cut lengthwise
Potatoes………………………2 big
Egg………………………………1
Gramflour……………………1 tsp
Salt…………………………….to taste
Red chilli powder…………..1 tsp
Turmeric powder…………..1/2 tsp
Water……………………………1 cup
Tempering:
Oil…………………1 tsp
Red chillies…………1
Mustard seeds………1/4 tsp
Cumin seeds…………1/4 tsp
Curry leaves……….4
Method:
1. In a pressure pan heat oil and add all the tempering ingredients one by one. Let them splutter. Add onions and green chillies let them fry.
2. Now add potatoes and all the ingredients except egg and gram flour should go in. cover and cook for 2 whistles.
3. Mean while mix the poori dough and keep it in fridge.
4. Now take off the whistle and cover check the water if u want can add some more now in a tsp of water mix gram flour and add it to the bhaji
and now add one egg let it stay before mixing till it gets thick now mix well mashing the egg into little balls.
5. That’s it it’s done.
Now coming to Pooris:
Enjoy them hot.
14 Aug
“HAPPY INDEPENDENCE DAY” TO ALL INDIANS AROUND THE WORLD!!!!
“Saare Jahaan Se Achha Hindhusthaan Hamara hamaraa……..”
I salute all the leaders and soldiers who sacrificed their life’s to give us the fruit of independence which we are enjoying now.
I am a proud Indian.
This is the song we have in our native place Andhra which I love from all.
“Yhe desa meginaa yendhu kaalidinaa pogadaraa nee talli bhoomi bharathi ni…..”
The above line means “Where ever you may go praise your “mother India”. Don’t forget the land where u r born.”
So Have Happy and Nice Independence day all of u.
12 Aug

Tandoori chicken is one of India’s most popular dishes. Tandoori chicken is originated from Mughals and now widely known as part of Punjabi cuisine famous for its wide range of tandoor recipes .This particular dish has a nice blend of sour curd/yogurt and masala blended well in the chicken when marinated. The spice mixture gives this crisp nice taste to the chicken. All of its work goes into how we marinate and how we cook them. If anything goes wrong it’s not less than a disaster. After many trails I have settled with this recipe of my own and all the trails r good but something is missing the perfect one I found in restaurants. I don’t say mine is ultimate but I got what I desired. And it’s the taste I loved in the restaurants in Hyderabad famous for its Nawabi Cuisine.
For more information about tandoor chicken click here.
Preparation time: 10mins
Cooking time: 45mins
Ingredients:
Chicken (drumsticks)………………….6 (make horizontal slits on the chicken pieces)
Yogurt……………………………………….2cups
Ginger-garlic paste………………….11/2 tbsp
Red chili powder………………………2tbsp
Garam masala…………………………2tbsp
Coriander powder…………………….1tbsp
Cumin powder…………………………1tbsp
Red food colour…………………………pinch
Lime juice …………………………………1tbsp
Oil ………………………………………….to grease the pan
Method:
Note:

Look it’s gone my daughter couldn’t resist them. And yup it’s my daughter’s hand in the first picture.
5 Aug

This is Called “Andhramata Gongura”. Gongura chutney and Mudda pappu is evergreen combination of Andhra. Well my father tells a little poetry while eating. Gongura pachhadi can be made in different ways. This is the way my grandmother and mom prepare when they are in a hurry and to make it soon for any lunch or dinner. Its shelf life is 1 week if refrigerated. But it’s authentic taste and flavor tempts us very much. There r different ways to make a pickle out of this but even this is very good. We make this as it tastes good and fresh. And the nutrients we get from this are more. It is fresh and has a very different taste. Specially made in coastal districts of Andhra as I know. And the onions in this chutney give a very special and different taste. When it is served with piping hot rice with a dash of ghee and this chutney it tastes good. And when I saw these leaves in grocery store then I grabbed a bunch so that I can make it. Then I called up my mom for recipe. Even though I make all kinds of chutneys I never prepared this one. And came to know it’s not special and I know how to do this one. I was so happy finally I could make this.
U can find more information on Gongura in Wikipedia.
Preparation time: 5mins
Cooking time: 5mins
Ingredients:
Gongura leaves/sour leaves…………4 hand full of leaves (don’t use the stem)
Red chilies (dried)………….10-12(as per spice level) toast them in a pan till it leaves flavor.
Onion……………………………1/2(small)
Cumin seeds………………….1/2 tsp
Garlic pod…………………………..1
Tempering:
Mustard seeds…………1/2 tsp
Cumin seeds………………1/2 tsp
Urad dal……………………1/2 tsp
Red chilies…………………1
Garlic pod………………..1
Curry leaves………………4
Oil………………………………1 tbsp
Method:
Tempering:
Add tbsp oil in a pan and add red chilies, garlic, mustard seeds, cumin seeds, urad dal, curry leaves. Add them in this order and let them leave a bit flavor around and add to the chutney prepared. Don’t over fry them
Note: 1.The gongura leaves are so sour adjust the spice level based on that. It goes well with rice and ghee as any other chutney does.
2. The taste also depends on tempering for any dish.
24 Jul
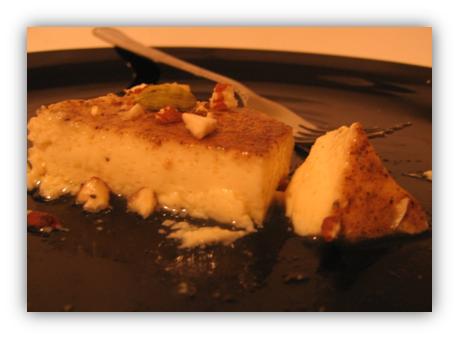
Attempt of making Junnu. I bet one cannot stop with a spoon and satisfy with a bowl. Junnu is famous sweet made in Andhra. Junnu is made from the cow’s lactating milk. The first 3 days milk after giving birth to a calf. The milk man’s happily distribute the milk when their cow deliver’s or another source in India is from villages. This sweet has a heavenly taste that we can’t forget. And the recipe I got I don’t even have the cow’s lactating milk (junnu paalu) but I succeeded in making it. One day my neighbor and friend Swapna prepared this sweet after looking at it I was amazed and was like hey how u made it? And pouring my questions on her without even inviting her in? (See how happy I am for the junnu she gave me………J ). I was so happy to learn we can make it even without lactating milk. Well I know that we can make it with china grass (china grass) that is available in Indian stores but never came through it. It was a nice and easy recipe. And I even searched for other version but I really feel this is easy as everyone has these ingredients in handy.
Preparation time: 10 mints
Cooking time: 45 mins
Serves………….. 4
Ingredients:
Sweetened Condensed milk…………1 can
Milk……………………………………………21/2 cups
Eggs…………………………………………….2
Cardamom powder………………………2 tsp
Black Pepper powder………………………………2 tsp
Method:
Note: The finished product will be little tight but looks like it’s floating u can check if it’s smooth and thick like cake and not hard like cake. It’s quite tricky. U will know when u prepare. It’s better when cooled. It leaves a little juice from it.
As i observed the above version will be difficult for vegiterians i am adding the other 2 versions i knew.
With Curd:
Sweetened condensed milk…………1can
fresh curd……..1cup
milk…………..1 cup
Sugar…………1/2 cup or to taste can use brown sugar.
cardamom powder………..2tsp
pepper powder……………..2 tsp
Method:
1. Mix condensed milk and yogurt and to that mixture add warm milk, add sugar to taste and add cardamom and pepper powders.
2. Follow the cooking procedure.Same as above.
With China grass:
1. For 1 can condensed milk, 1/4 cup of sugar ,2 cups of milk mix all of them and boil it .
2. When milk boils add china grass (10gms) and let it dissolve in the milk completely.
3. Add cardamom and pepper powders ,let it cool in fridge or pour in shaped containers and cool it in a fridge so it becomes thick.
4. It’s done.
Note:
wash the china grass before use. I haven’t tested the above 2 versions i tested only the first version with eggs.
Will let u know when i prepare these also.
I hope u all like this all at one place.
21 Jul
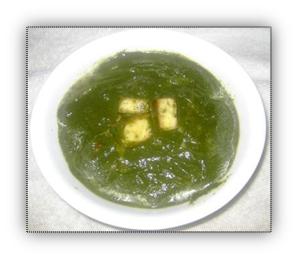
Punjab……………The land of Five rivers. The Punjabi Cusine is one of the best cuisines in India. Of course each and every state has their own cuisine, but all of them Punjabi cuisine takes the cake from all by its variety starting Buttery parathas, Naans, Kulchaas to palak paneer, tandoor and the rice variety all with the sufficient blend of spices in them. Today I am posting palak paneer. Let me tell u something we can make this easily. I am fond of palak paneer I love eating it with Naan .But Now this is the fastest dish I can make for a nice healthy dinner. I still remember the day in Newyork airport we had this Punjabi chole and spinach curry with rice for 7$ 5yrs back. Till then I was not an ardent fan of any cuisine other than Andhra except for Manchurians.
I am posting this for RCI Punjabi cuisine hosted by Richa of As Dear As Salt.
Preparation Time: 5 mints
Cooking time: 10 mints
Spice level is mild.
Serves…………4
Ingredients:
Spinach……………..1 lb pack.
Paneer (Indian cottage cheese)……….1 pack (cut into cubes)
Onion…………………1 chopped
Green chillis……….3 chopped
Garam masala……….1 tsp
Salt………………………….to taste
Turmeric………………….I/4 tsp
Ginger-garlic chopped……… 1 tbsp
Method:
Serve hot with Naan or as u wish. We had ours with Butter Naan.
19 Jul

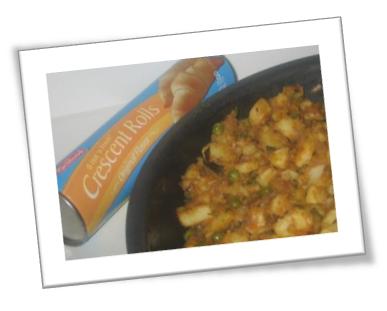
As a kid I always loved eating samosas. Well who don’t love eating them? When I go down through my memory lane samosas are part of my life. It’s a very nice snack to eat out. I never tried making them at home. I still remember my college days we ate the huge hot samosas in our college canteen. I wish we can again go and sit in the canteen and eat with friends. And when we are staying in Hyderabad my hubby dear pampered me bringing samosas almost every day while returning from office (he sure does know my tastes).Ahh……….those golden brown colour and the curry in it is sure a treat for jihva. We cannot stop eating them. But the thing I don’t like is the deep frying in samosas. Then I thought to bake. With what? I had crescent rolls handy and gave it a try. Though these r fake samosas and this is just an attempt to make them. We loved the beauties. Hope u too will love them. As this is made of crescent dough it taste entirely different. But it’s a good change once in a while. U can make this with puff pastry also. That will be another post. I am saving it.
Preparation time:40 mins
Ingredients:
Crescent rolls…………………1(Pillsbury preferred)
Potatoes………………………4 big (boiled and cut into pieces)
Onion……………………………1 big (chopped)
Peas…………………………….1 cup
Coriander leaves……………1 fistful
Green chillis…………………………3(chopped)
Ginger-garlic paste……………..1 tsp
Garam masala……………1/2 tsp
Chat masala……………….1/2 tsp
Turmeric………………………..1/4 tsp
Red chilli powder…………1/2 tsp
Lemon juice………………..2 tsp
Salt ………………………….to taste
Oil…………………………….2 tsp
Method:

Making stuffing:
Making Rolls:
Serve hot with tomato ketchup or green chutney.
14 Jul

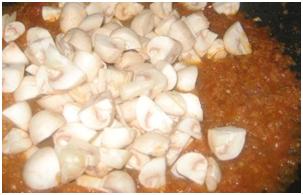
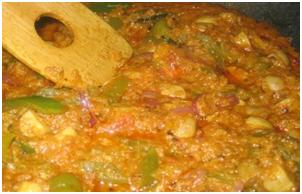
I am occupied a bit with my daughter, husband and everything else except blogging is in my list of items. These days my daughter is going to pre-school and I thought I get some-time for me and I am getting the time and enjoying it. But I put blogging on the second burner it’s not I don’t have time or anything but I am feeling a little full off hands with all those I want to do. that’s it. And coming to the recipe there is something to tell about this. Here is the good nutritious Mushroom curry which just boost your taste buds. This is another one from my hubby. Trust me it’s a good one from him. It just has sufficient amount of everything in it and resembles restaurant dish. I have another thoughts in my mind why not start as a restaurant with my hubby as a chef. OK….OK……..I am crazy. I am kidding. But it’s not a bad idea. What does u say? OK now let us jump to the recipe.
Ingredients:
Mushrooms………………….1 pack (button preferred as whole else slice them).
Green pepper………………..1 chopped lengthwise
Onion………………………………1 big (paste) and 1 small……….sliced
Tomato……………………………1 big (paste)
Yogurt……………………………2 tsp
Garam masala………………..1/4 tsp
Chilli powder…………………..1/4 tsp
Salt…………………………………..to taste
Coriander powder…………………1/2 tsp
Cumin powder…………………..1/4 tsp
Turmeric powder………………..1/4 tsp
Oil…………………………………………2 tsps
Method:
27 Jun
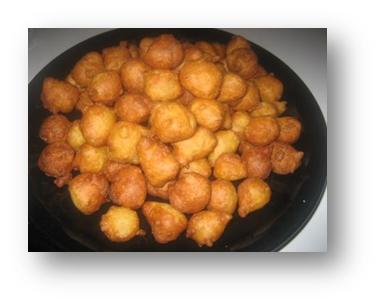
Ingredients:
Rice flour………….1 cup
All-purpose flour…..1/2 cup
Yogurt/curd……………2 cups (should be a bit sour).
Baking soda……………1/2 tsp
Salt………………………….to taste
Carrots……………………2(grated)
Onion……………………….1 (small) chopped
Green chilies………………3 chopped (omit this for children)
Oil……………………………..to deep fry
Method:
1. Mix all the ingredients with curd, water (if needed).The batter should be thick (so that we can be able to drop little balls in hot oil).
2. Heat oil in a pan.
3. Drop the batter into small balls using hand or spoon.
4. Fry till they turn golden brown drain and remove onto tissue paper.
5. Serve hot with ginger chutney or groundnut chutney.
Note: These taste better if the batter is prepared 3o mins prior to making them.As our curd will not be that sour that we get in India. And they even soak a bit and tastes good.


Recent Comments